
Unix systems have been around for more than half a century. But, with Linux and Mac OS X, Unix systems have now achieved wide-spread success. Mac OS X is extremely well designed, but Apple does not play well when you attempt to step outside its ecosystem. Even an older iPhone or computer can be left behind and unsupported by Apple (until recently, Apple still supported Windows XP for various products such as iPhone syncing, but Apple offered no similar support for many of its own prior operating systems, such as 10.6, even though that operating system was not nearly as old as Windows XP).
Linux has been around longer than Mac OS X, but Linux failed to gain much popularity until Mark Shuttleworth started Canonical) and its Ubuntu project) of creating a desktop for the masses that would be updated twice annually on a regular schedule (each April and October, hence the naming conventions for Ubuntu versions featuring the year and month of the release along with an alliterative name — 14.04 aka Trusty Tahr, for instance).
NOTE: I understand that Linux’s popularity is relative. Though US readers should note that Linux and various derivatives receive much more attention and desktop use outside of the United States.
As with all things Linux, various flavors of Ubuntu have emerged over the years (Ubuntu itself is based on Debian). The main distinction between these flavors of Ubuntu has been the desktop environment on which they are based: Gnome or Unity for Ubuntu, KDE for Kubuntu, Gnome 2-something for MATE, and xfce for Xubuntu. Except for Ubuntu proper, most of these other flavors are volunteer-supported projects.
NOTE: On the problem of Linux fragmentation, see this post.
In 2009 and after trying Ubuntu out, I opted for Xubuntu because my computer at the time was limited in both memory and horsepower. Xubuntu also presented the opportunity for a great deal of customization — customization that I have honed over the years and thoroughly enjoy even when I had in 2011 a powerful MacBook Pro to use.
Now in 2018, the MacBook Pro has been replaced with Galago Pro from System76. Here is a review of that new laptop along with the 18.04 version of Xubuntu — Bionic Beaver.
The new laptop
As noted on the official setup page, I use two computers for my work: a desktop (originally a Dell GX620 Pentium 4 at 3.2 Ghz with 2 GB of RAM replaced with a Lenovo thinkcentre m58 at 3.0 MHz and 4 GB of RAM) and a laptop. Originally, the laptop was a 2011 13″ MacBook Pro running a Core i7 at 2.7 MHz with 8 GB of RAM. That laptop has now been replaced with a Galago Pro 14″ from System76 that is running a Quad core Intel Core i5-8250U at 3.4 MHz max, 8 GB of RAM, and a very fast 500 GB SSD along with a 1,000 GB second drive that has a flash cache.
Here are the order details:
- Ubuntu 18.04 LTS (64-bit)
- 13″ 3200×1800 HiDPI Display
- Intel® UHD Graphics 620
- 3.4 GHz i5-8250U (up to 3.40 GHz – 6MB Cache — 4 Cores — 8 Threads)
- 8 GB DDR4 at 2400 MHz (1 x 8 GB)
- 500 GB NVMe PCIe M.2 SSD $265.00
- 1 TB 2.5″ Solid State Hybrid Drive
- United States Keyboard
- WiFi up to 433 Mbps + Bluetooth
- 1 Year Limited Parts and Labor Warranty
- Normal Assembly Service
As noted in this list, the Galago Pro originally came with Ubuntu 18.04 as the default operating system. I immediately ran sudo apt-get install xubuntu to get the 18.04 version of Xubuntu, my preferred Ubuntu install. This switch to Xubuntu also required a switch in the initial X display manager that handles the initial boot and login from GDM (Gnome Display Manager) to LightDM.
Basic hardware information is available via the inxi command.
$ inxi
CPU~Quad core Intel Core i5-8250U (-MT-MCP-)
speed/max~800/3400 MHz Kernel~4.15.0-29-generic x86_64
Up~1 day Mem~3588.8/7854.8MB HDD~1500.3GB(5.2% used)
Procs~270 Client~Shell inxi~2.3.56
NOTE:
inxiis amazingly useful. Seeinxi -hfor all the options. For example:$ inxi -C
CPU: Quad core Intel Core i5-8250U (-MT-MCP-) cache: 6144 KB clock speeds: max: 3400 MHz 1: 800 MHz 2: 800 MHz 3: 800 MHz 4: 800 MHz 5: 800 MHz 6: 800 MHz 7: 800 MHz 8: 800 MHz$ inxi -B
Battery BAT0: charge: 35.7 Wh 100.0% condition: 35.7/36.5 Wh (98%)$ inxi -G
Graphics: Card: Intel UHD Graphics 620 Display Server: x11 (X.Org 1.19.6 ) drivers: modesetting (unloaded: fbdev,vesa) Resolution: 1600×900@59.99hz OpenGL: renderer: Mesa DRI Intel UHD Graphics 620 (Kabylake GT2) version: 4.5 Mesa 18.0.5
For comparison, here are some pics of the Galago Pro, the Dell XPS 13, and my original 13″ MacBook Pro.


Finally, note that Apple released a MacBook Pro with this 8th generation of CPU in July 2018. The CPU on this new MacBook Pro is slightly faster, and the Intel Iris Graphics are also faster on the MacBook Pro — Iris Pro 655 vs. 620 on the Galago Pro.
Memory
The big advantage of Xubuntu is having a modern and sleek operating system running on modest hardware. As noted above, my original desktop was a Pentium 4 from 2006 with only two gigabytes of memory (the maximum available for this computer).
On that original desktop, a host of native apps were running at boot, including several cloud computing apps below — such as AeroFS, DropBox, and InSync at various times and combinations with each other — along with the file search app Recoll. None of these apps were running on the guest systems in Parallels or Virtual Box on the MacBook Pro. But, both guest systems also end up with slightly less memory that initially allotted to the system. Here is the memory usage for each after boot when all three were running 14.04:
- Desktop: 925 MB out of 2012 MB
- Parallels: 641 MB out of 1998 MB
- Virtual Box: 632 MB out of 2001 MB
Anyone on Mac OS will probably be amazed by these numbers. Indeed, later versions of Mac OS fill up 4 MB all too quickly, and 8 MB seems to be the minimal now needed.
As with all “progress,” memory usage on Xubuntu has climbed slightly since the days of 14.04. Under 18.04, here are the numbers for my current desktop (with the 4 MB of RAM) and the Galago Pro that has 8 MB:
- Desktop: 1680 MB out of 3627 MB
- Galago Pro: 1032 MB out of 7855 MB
The desktop number is high because I am also running the anti-virus daemon clamd:

Both computers are running insync, DropBox, and recoll when started (more on these apps below).
Keep in mind that the work being done is focused on e-mail, word processing, and web searching of numerous kinds. So, 8 MB is probably all I will ever need. If I needed more memory, however, I already have an empty slot available for more. The Galago Pro does NOT have soldered memory, and the 8 MB that is installed is on one stick/one slot.
$ sudo inxi -m
Memory:    Used/Total: 1031.9/7854.8MB
       Array-1 capacity: 32 GB devices: 2 EC: None
       Device-1: ChannelA-DIMM0 size: 8 GB speed: 2400 MT/s type: DDR4
       Device-2: ChannelB-DIMM0 size: No Module Installed type: N/A
So, the second slot is vacant and ready for an addition at my convenience. Kudos to System76 for this kind of memory install.
Display
I have a 13″ Hi-Def 3200×1800 display, what Apple calls a retina display. Xubuntu’s support for these kind of displays is limited, especially when additional themes are used.
System76’s new OS — Pop OS — is an effort, in part, to address these kind of problems. See, for instance, this blog post about System76’s efforts with its own HiDPI daemon.
And, there are solutions with Ubuntu as well that allow for picking traditional desktop resolutions and setting the magnification of the Hi-Res display via a slider scale.
Xubuntu lacks those options. Instead, you simply pick an available resolution.

You will have selected a “proper” display option (one that doubles the pixel density) when the refresh rate for that resolution is 120 Hz.
Hi-Def screens have received much hype since Apple’s introduction of its retina screens. For the most part, it seemed that there was not much substance to this hype. Now, with such a screen before me, I have gone from a 1440×810 display to a 1600×900 display. Even with my older eyes, I find no problems with smaller text on this screen.
No doubt, this clear text owes something to how Xubuntu and xfce handle fonts from out of the box. Apple has been way ahead on this front for decades, and even Microsoft has made substantial gains the past decade or so. See Fonts, don’t come easy to me (15 Sept. 2015), Make Fedora Fonts Better (28 Jan. 2017), and Fedora fonts: The Font Strikes Back (8 July 2017) for details about Linux’s ongoing problems with fonts and possible fixes. Here are the default Settings Manager | Appearance | Fonts settings in Xubuntu.

The only issue I have seen at all with fonts is that Liberation Serif no longer displays well in LibreOffice when single-spaced.

The line-spacing is off — a little less leading is being used for some unknown reason. My guess is that the problem is connected to LibreOffice 6.0, but I have not had the time to track it down.
Note (10 May 2019): This display problem was connected to an older version of the liberation font family. Once I removed the 1+ version (while keeping the 2+ version, the display problem went away. Strangely, the Vivaldi browser requires the 1+ version of the Liberation font family, so that version was reinstalled with an update to Vivaldi at some point. The display problem with Liberation has not recurred, however.
My only other complaint is that light-locker — the Xubuntu default for handling display power use and shutting the display off — does not get along with gnome screen saver that come with Ubuntu. My solution: remove both and install XScreenSaver. XScreenSaver includes gl-matrix — a matrix-movie style display. I have it set to start the screensaver after three minutes and under the advanced settings to dim the display after 15 minutes.

Settings Manager | Screensaver | Advanced
With these screen saver settings, the Settings Manager | Power Manager | Display tab is switched off.
My only problem so far has been an occasional hang when waking the computer from sleep. When the lid is open when the laptop has fallen asleep (i.e., suspend state), holding the power button wakes the computer but not the display. I need to press the power button again to get the XScreenSaver unlock dialog, but the keyboard and mouse do not function whatsoever. The only way out of this problem is a hard reset by holding down the power button for five seconds and shutting down the computer.
I am also quite pleased with the matte finish of the display. The glossy finish of the MacBook Pro display always seemed to capture to many reflections. The matte finish of the Galago Pro, on the other hand, makes this laptop that much easier to use in bright settings, include sunny, outside settings.
Disk drives
Here are some quick charts regarding the read and access speed of the SSD main drive, the traditional disk second drive (which has a flash cache), and a traditional drive connected via USB 2 to a USB 3.1 port.


As you can see, the SSD is blazing fast.
Keyboard
The Galago Pro keyboard does not quite have the quickness and ease of the 2011 keyboard. The keys are stiff and seem to require more of a push. Still, the keyboard is pretty close to the 2011 MacBook Pro keyboard, which is probably now considered one of the best laptop keyboards ever made. Moreover, the Galago Pro keyboard is miles ahead of the current laptop keyboards Apple is putting out. There is still a physical esc key and fn keys along with a Del and set of Home, PgUp, PgDn, and End keys (though the right side of the keyboard is somewhat crowded and takes some getting used to for those new to the placement of those keys on the right side of the keyboard).
The keyboard is missing an indicator for the CapsLock, however. It has not been a problem yet for me, but I can imagine many getting frustrated by a lack of indicator.
Another problem is that keyboard lighting is uneven. As this pic shows, the four keys in the upper-right corner bleed additional light from underneath.

Track-pad
Apple’s track-pads are the best available. I kept my 2011 MacBook Pro as long as I did in large part because of its track-pad and the fact that performance was on par with current laptop offerings for my purposes. Everything about the Apple track-pad was well nigh perfect: cursor movement, two-finger scrolling, clicking, and even the occasional fancy gesture (like a swipe up or down to trigger some special feature or shortcut).
So, it is not surprising that the Galago Pro track-pad does not measure up to what Apple’s laptops offer. The small size of the track-pad means there is limited real estate in which to move around compared to what I had before.
The physical button or click-bar at the bottom of the track-pad has been especially difficult to get used to. In place of a simple click anywhere for a left-button click and hold down the Ctrl key when clicking for a right-button click, I now have to click on one-half of the click-bar for a left-button click and stretch to the other half of the click-bar for a right-button click.
And, I still have not figured out an easier way to get a middle-button click (which Parallels provided to me on my Mac via a Ctrl-Shift-Click shortcut). Pressing both left and right buttons emulates a middle-button click, but a successful middle-click via this technique requires stopping my work, intentionally placing both hands on the track-pad buttons, and then pressing both simultaneously — not a simple task to do all that often (luckily, middle-clicks are not needed all that often — in my usage, mostly for spelling corrections in emacs).
Here is how I have set my track-pad so far:

NOTE: You can see all the track-pad’s details with this terminal command:
synclient -l. The following command,sudo synclient EmulateMidButtonTime=100drastically improved the responsiveness of the left-right click emulation process for me (the default setting was 75).
Still, the Galago Pro track-pad is pretty easy to use, and is getting easier as my hands gain familiarity with it. Unlike many track-pads on windows machines that are basically unusable out of the box and never become usable because of jumpiness, this track-pad is more than functional and is getting to be quite normal for me after a couple of months of use. So, while this track-pad is not at the level of Apple’s track-pads, it is certainly in the same room as them and is much improved from what typically accompanies most mainstream laptops. I would even rank it slightly better than the track-pad that accompanies Dell’s XPS 13 laptops.
Ports, connectivity, and repair
The Galago Pro comes with ports on both sides of the laptop. On the left, there is a power port (4 X 1.7 mm), a type-A USB port, the on/off switch, and separate microphone and headphone ports. On the right, there is a lock, an Ethernet jack, a port for an SD card, an HDMI port and mini-Displayport, another type-A USB port, and a combination USB type-C/Thunderbolt 3 port.
NOTE: The type-A USB ports are full speed 3.1 USB ports with traditional type-A connectors. So, they are the same speed as the USB-C port: 10 Gbit/s (1250 MB/s).
The Thunderbolt 3 port does not charge the laptop. But, this port does connect to my Thunderbolt 2 dock via an Apple Thunderbolt 3<->2 adapter without any hitches. Hard drives mount (including FireWire drives).
NOTE: The Thunderbolt 2 dock has been hit and miss so far. One attempt at display connections did not work, and a recent plugin of the dock produced no connection whatsoever. More investigation of this port and the dock is needed.
The mini-Displayport works with my Apple mini-Displayport adapters.
There are four lights for indicating various status or activities.

The left-most indicates power (on) or sleep (blinking). The second is for the battery (green when fully charged, orange when charging, off when unplugged), the third is for airport mode (WiFi and Bluetooth off by pressing Fn-F11), and the fourth blinks when there is hard drive activity).
Finally, this laptop is fully repairable (ifixit should do a tear down as a comparison to offerings from other manufacturers), as seen in this video. Memory, hard drives, and battery can be easily replaced or upgraded (and the keyboard CAN remain in place for those repairs as well). And, all of this access is available in an ultra-thin and ultra-light computer. Well done.
Battery
Hints and techniques for fine-tuning of the battery are available from System76.
The charger is unique — 19 volts, 2.1 Amps, and 40 watts — and has a 4×1.7 mm barrel plug. I certainly miss the simplicity and, yes, sheer beauty of Apple’s chargers and mag-safe connectors.
As I need the laptop for work, I have yet to set it aside in order to run some specific battery tests on it. But, I am generally losing 5% of the charge in around 40 minutes. With those numbers, I should have about 3 hours and 20 minutes of use, and my experience so far is that actual battery usage should probably last around four hours or more (I have already used the laptop three plus hours without charging and still had 10-20% of the battery remaining).
System76 has deliberately chosen a smaller battery for the sake of repairs and expansion. For me, four hours of battery is more than enough.
Customizing the desktop
Xubuntu and xfce allow for a great deal of customization. The windows on my computers, for instance, are modified from the default. The close, minimize, and maximize buttons are moved to the left corner of the window title bar via Settings Manager | Window Manager | Style as shown:

I have been with Macs for several decades, and so my muscle memory is deeply ingrained with moving to the left corner of windows for these buttons. The great thing about Xubuntu and xfce is that these kinds of changes are allowed.
You should also see that I have a different theme from the default GreyBird. In Xubuntu, themes and icons are set in two places: Settings Manager | Appearance and Settings Manager | Window Manager. In the former — Appearance — I have GreyBird selected as my Style and xfce elementary darker as my icon set. In the latter — Window Manager — I have “Ambiance-Flat-Pink” selected as the style from the Ambiance & Radiance FLAT theme available from RAVEfinity. Directions for adding the PPA for this theme are available here as well as direct links for the DEB packages (more on software updating and installing below).
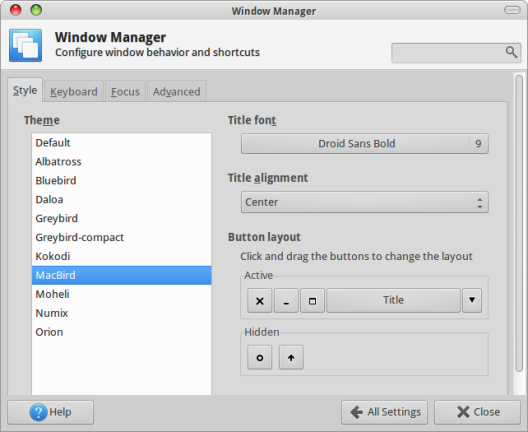
For those looking for identical buttons to what Mac OS X offers, try the macbird theme for displaying the red, yellow, and green dots for these buttons. Here are the settings from my Settings Manager | Window Manager | Style from my desktop in 2015:
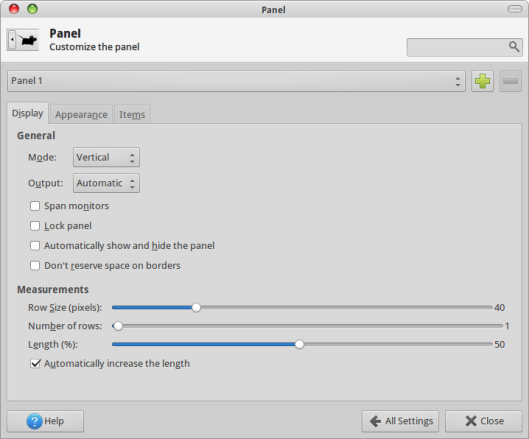
I have also gone to one panel (the xfce version of Windows Start Bar or the Mac OS X dock) on all my systems.

Previously, I had two panels: one across the top where windows, indicators, and notifications along with basic info such as the clock and action — aka logout — buttons were. I now have all this information in one panel. Here are the Settings Manager | Panel windows for obtaining this single panel.


Additional information about customizing your desktop is available from Xubuntu.
Updating and installing apps
Software is always being updated on Ubuntu systems. In general, these updates occur automatically, as seen in these settings.

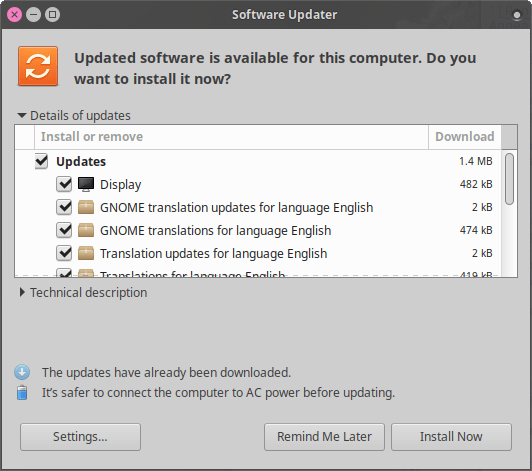
When there is software to update, you will see a dialog box similar to the following:
New software There is a Software app for finding new apps to use.

Personally, I prefer Synaptic.

With Synaptic, you can right-click on a package to see the recommended and dependent software that will be installed along with the selected application.
The easiest way to get Synaptic is the following terminal command: sudo apt-get install synaptic. There will be many additional apps and recommended apps to install.
Another GUI way to install software is with the gdebi app.

Gdebi is especially useful when downloading standalone apps, like Master PDF (discussed below).
You can use Synpatic to install gdebi or this terminal command: sudo apt-get install debi.
Finally, Ubuntu has introduced a new format for apps — snap — that houses all the dependencies of that application in one installation bundle. Snap is still mostly focused on the command line. Here are the snaps currently installed on my system.
$ snap list
Name                  Version             Rev   Tracking  Developer  Notes
canonical-livepatch   8.0.2               41    stable    canonical  -
core                  16-2.33.1           4917  stable    canonical  core
gnome-3-26-1604       3.26.0              70    stable/…  canonical  -
gnome-calculator      3.28.2              180   stable/…  canonical  -
gnome-characters      3.28.2              103   stable/…  canonical  -
gnome-logs            3.28.2              37    stable/…  canonical  -
gnome-system-monitor  3.28.2              51    stable/…  canonical  -
gtk-common-themes     0.1                 319   stable    canonical  -
vlc                   3.0.3-1-3-gf09fd0d  365   stable    videolan   -
These snaps are connected to the regular software update process, and so are updated accordingly. Information about how to use snaps are available with either the snap --help or man snap terminal commands.
Apps: what there is to like
Firefox, Thunderbird, and LibreOffice are part of the standard Xubuntu package.
With FireFox, I have a title bar and a menu bar enabled, and my add-ons are minimal.

With Thunderbird, I originally used gContactSync to sync contacts in Thunderbird and a gmail account. I now use CardBook.
I have customized toolbars and menus in LibreOffice, created specific paragraph styles and templates, and connected various macros to specific keystrokes. As a lawyer, for instance, I often need to use ¶ or § characters. Here is one such macro:
sub ParagraphMarkInsert
rem ----------------------------------------------------------------------
rem define variables
dim document   as object
dim dispatcher as object
rem ----------------------------------------------------------------------
rem get access to the document
document   = ThisComponent.CurrentController.Frame
dispatcher = createUnoService("com.sun.star.frame.DispatchHelper")

rem ----------------------------------------------------------------------
dim args1(1) as new com.sun.star.beans.PropertyValue
args1(0).Name = "Symbols"
args1(0).Value = "¶"

dispatcher.executeDispatch(document, ".uno:InsertSymbol","", 0,args1())

end sub
NOTE: It is easy to get a macro like the above through the
Tools | Macros | Record macromenu command, which records keystrokes and menu selections to create a macro.
Through Tools | Customize | Keyboard, selecting the key combination Alt-7, and then selecting the ParagraphMarkInsert macro for LibreOffice Macros | My Macros | Standard | Module1, this macro can then be connected to the specific keystroke.
I have used Synaptic to add Emacs, org-mode/elpa-org, ispell, emacs-goodies-el, and elpa-markdown-mode along with markdown itself. As a long-time user of Emacs, I find it immensely useful and easy to get the Emacs additions I need through Synaptic.
I have also added Recoll to allow me to search the content of my files for phrases. Recoll is set to index my files on the fly. It occasionally crashes, but it works for finding specific content across thousands of files.

Catfish is another file-search tool — a GUI for the terminal find and locate commands. If I know a file name or a part of a file name, catfish provides an incredibly fast way to find a file, and I probably use it now as much as I use recoll, if not more so.
Printing
Just plain works. Xubuntu has excellent documentation on this issue.
The only problem you might have is with the drivers needed for your printer, as Linux systems are still step children for most printer manufacturers. I use a Brother all-in-one printer/scanner, so the installation required downloading and installing multiple files (both CUPS and LPR drivers are needed, and LPR drivers should be installed first).
Scanning
XSane, another app I have added to supplement Simple Scan that comes with Xubuntu, is fantastic. Make sure to adjust settings as needed, such as paper size — Window | Show Advanced Options. The scan dialog pops up and is ready to go once I select the number of pages to scan.

pdftk is a command-line app that I find immensely useful. It not only combines and splits up pdf documents, but it also provides a way to add a Bates stamp (i.e., page numbering).
pdftk INPUTDOC multistamp PAGENUMBER_DOC output OUTPUTDOC
In this example, the pagenumber_doc is a 200 pp. pdf file that only has page numbers in a pre-set location and style.
NOTE: pdftk is no longer included with 18.04, but as noted here there are several ways of getting it installed despite this problem.
Master PDF Editor lets me edit pdf docs and now includes redacting tools. The OCR is excellent, and an immensely useful tool is its ability to reduce the size of pdf files via its File | Save optimized as . . . command (clients too often send me B&W pages as scanned full-color images).
One thing I wish would happen is that settings would remain set when a new version is installed after an upgrade.
Networking
Wifi works without a hitch.

Samba and ssh are available options via thunar.

As demonstrated here, thunar presents a traditional file management interface. Shortcuts are available on the right. Menu commands provide numerous options, and the contextual (right-click) menu provides options for opening a terminal window or a catfish search window at the specific location. I much prefer this display and the menu options from what comes with nautilus and the standard Ubuntu install.

Cloud computing
As noted in other posts on this blog, I use both insync and DropBox. See these posts for details.
iPhone connectivity
For connecting an iPhone to Linux, start with Dedoimedo’s most recent how-to. Keep in mind that the key to iPhone connectivity is usbmuxd.
Getting usbmuxd to run automatically via a sudo systemctl command produced errors on my desktop. So, another option is to simply manually run sudo usbmuxd after every reboot (as once run, this daemon continues to run in the background until a reboot or log off).
And so . . .
The Galago Pro is getting better and better the more I use it. After a couple of months now, my fingers are moving along the keyboard and the track-pad just like they used to with my MacBook Pro.
And, Xubuntu 18.04 on this device has been stellar. Many of the problems that had cropped up in prior versions have now been fixed. The system is also still lean and quick. I may not have the cutting edge of OS design, but I am avoiding the gimmicks that seem to pop up with those new designs and the resulting problems and kludges that come with those changes.
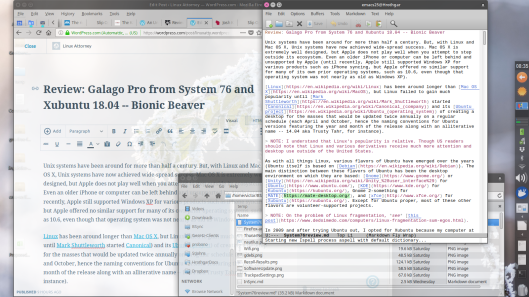
UPDATE (23 July 2018): Set featured image — desktop screen grab — for post.
UPDATE (10 May 2019): Added a note about a fix to the Liberation font display bug I had been seeing.

Nice! Though I’d suggest also trying PCManFM – in my opinion it is superior to Thunar. More control over the left side and you get the terminal as a right click option.
Terminal is a right-click option in thunar on Xubuntu.
I always prefer to install from a Xubuntu image if I want to use xfce rather than installing xubuntu-desktop on top of Ubuntu proper. The system feels a lot lighter in terms of resource usage.
Pingback: Geekbench scores | Linux Attorney
Pingback: Collection of System76 Laptop Reviews 2015-2019 - Data Fidelity
Pingback: Collection of System76 Laptop Reviews 2015-2019 - SharewarePile.com - Latest Web Hosting News
Pingback: Browser speed tests | Linux Attorney