Trying out whisper for transcribing audio

Tags

Artificial intelligence is all the rage nowadays, and Barton Gellman indicated how whisper.cpp presented fantastic accuracy.

So, I gave the app a run, and it is impressive. Unfortunately, directions for usage could be a bit better. Here are some helpful tips.

First, some directions for installing.

  1. Clone the git repository.

    $ git clone https://github.com/ggerganov/whisper.cpp

  2. Move into the newly created cloned whisper.

    $ cd whisper.cpp

  3. Compile the software.

    $ make [My systems are pretty vanilla, and there were no hitches with the compile. Kudos to those writing this software.]

  4. Next, install a transcription engine by running the download script for one of the engines. There are five to choose from: tiny, base, small, medium, and large. Below, the base engine is installed.

    $ cd models
    $ ./download-ggml-model.sh base.en [downloads the base engine]
    $ cd .. [to return to the whisper.cpp directory]

Whisper and the base engine is now installed and ready to go. The basic whisper command structure is:

usage: `./main [options] file0.wav file1.wav ...`

Useful/important options to consider using, in order of use, are:

  • -m MODEL [engine model to use]
  • -otxt [txt file output format]
  • -ocsv [csv file output format]
  • -of FILENAME [name of output file, without an extension]
  • -f WAV FILE [name of wav file to transcribe]

To see all available options, enter ./main -h. Here is the output from running the following command with a short file from one of my unemployment hearings (client name and phone number removed from the transcription).

$ ./main -m models/ggml-base.en.bin -otxt -of Client-test -f ClientSample.wav

whisper_init_from_file: loading model from 'models/ggml-base.en.bin'
whisper_model_load: loading model
whisper_model_load: n_vocab       = 51864
whisper_model_load: n_audio_ctx   = 1500
whisper_model_load: n_audio_state = 512
whisper_model_load: n_audio_head  = 8
whisper_model_load: n_audio_layer = 6
whisper_model_load: n_text_ctx    = 448
whisper_model_load: n_text_state  = 512
whisper_model_load: n_text_head   = 8
whisper_model_load: n_text_layer  = 6
whisper_model_load: n_mels        = 80
whisper_model_load: f16           = 1
whisper_model_load: type          = 2
whisper_model_load: mem required  =  215.00 MB (+    6.00 MB per decoder)
whisper_model_load: kv self size  =    5.25 MB
whisper_model_load: kv cross size =   17.58 MB
whisper_model_load: adding 1607 extra tokens
whisper_model_load: model ctx     =  140.60 MB
whisper_model_load: model size    =  140.54 MB

system_info: n_threads = 4 / 8 | AVX = 1 | AVX2 = 1 | AVX512 = 0 | FMA = 1 | NEON = 0 | ARM_FMA = 0 | F16C = 1 | FP16_VA = 0 | WASM_SIMD = 0 | BLAS = 0 | SSE3 = 1 | VSX = 0 | 

main: processing 'ClientSample.wav' (4940975 samples, 308.8 sec), 4 threads, 1 processors, lang = en, task = transcribe, timestamps = 1 ...

[00:00:00.000 --> 00:00:06.120]   This is a continuation of the hearing we were having difficulties with the connection.
[00:00:06.120 --> 00:00:11.280]   So ultimately I just decided to disconnect and connect all the parties again.
[00:00:11.280 --> 00:00:15.000]   I'm going to call the attorney first.
[00:00:15.000 --> 00:00:25.200]   Hello, this is administrative law judge Barbara Gerber.
[00:00:25.200 --> 00:00:27.320]   Do we have a better connection?
[00:00:27.320 --> 00:00:28.320]   It is better.
[00:00:28.320 --> 00:00:35.320]   All right, let me try to connect Miss CLIENT again.
[00:00:35.320 --> 00:00:55.320]   It's styling.
[00:00:55.320 --> 00:01:13.320]   Please leave your message for ###-###-####.
[00:01:13.320 --> 00:01:21.240]   Miss CLIENT, this is administrative law judge Barbara Gerber calling regarding your unfinished
[00:01:21.240 --> 00:01:23.200]   unemployment appeal hearing.
[00:01:23.200 --> 00:01:27.440]   I'm going to wait a couple of minutes and then I'll give you another call and hopefully we
[00:01:27.440 --> 00:01:29.440]   can make a connection at that time.
[00:01:29.440 --> 00:01:30.440]   Thank you.
[00:01:30.440 --> 00:01:37.240]   So Mr. Forberger, I'm going to give her about five minutes and see if she can figure out
[00:01:37.240 --> 00:01:46.360]   either a different phone or location and get to some spot where we can finish the hearing.
[00:01:46.360 --> 00:01:50.160]   All right.
[00:01:50.160 --> 00:01:59.840]   Attorney for Berger.
[00:01:59.840 --> 00:02:03.240]   Thank you.
[00:02:03.240 --> 00:02:13.240]   [BLANK_AUDIO]
[00:02:13.240 --> 00:02:23.240]   [BLANK_AUDIO]
[00:02:23.240 --> 00:02:33.240]   [BLANK_AUDIO]
[00:02:33.240 --> 00:02:43.240]   [BLANK_AUDIO]
[00:02:43.240 --> 00:02:53.240]   [BLANK_AUDIO]
[00:02:53.240 --> 00:03:03.240]   [BLANK_AUDIO]
[00:03:03.240 --> 00:03:13.240]   [BLANK_AUDIO]
[00:03:13.240 --> 00:03:23.240]   [BLANK_AUDIO]
[00:03:23.240 --> 00:03:33.240]   [BLANK_AUDIO]
[00:03:33.240 --> 00:03:43.240]   [BLANK_AUDIO]
[00:03:43.240 --> 00:03:53.240]   [BLANK_AUDIO]
[00:03:53.240 --> 00:04:03.240]   [BLANK_AUDIO]
[00:04:03.240 --> 00:04:13.240]   [BLANK_AUDIO]
[00:04:13.240 --> 00:04:23.240]   [BLANK_AUDIO]
[00:04:23.240 --> 00:04:33.240]   [BLANK_AUDIO]
[00:04:33.240 --> 00:04:43.240]   [BLANK_AUDIO]
[00:04:43.240 --> 00:04:53.240]   [BLANK_AUDIO]
[00:04:53.240 --> 00:05:03.240]   [BLANK_AUDIO]
[00:05:03.240 --> 00:05:13.240]   [BLANK_AUDIO]

output_txt: saving output to 'Client-test.txt'

whisper_print_timings:     fallbacks =   4 p /   0 h
whisper_print_timings:     load time =   230.18 ms
whisper_print_timings:      mel time =  2945.69 ms
whisper_print_timings:   sample time =   511.61 ms /   564 runs (    0.91 ms per run)
whisper_print_timings:   encode time = 63995.05 ms /    26 runs ( 2461.35 ms per run)
whisper_print_timings:   decode time = 11700.60 ms /   548 runs (   21.35 ms per run)
whisper_print_timings:    total time = 79435.22 ms

As noted in this output, a txt file called Client-test.txt with this transcription was also produced. A test with the same WAV file using the medium engine produced this text (time stamps removed).

This is a continuation of the hearing.
We were having difficulties with the connection, so ultimately I just decided to disconnect
and connect all the parties again.
I'm going to call the attorney first.
Hello, this is Administrative Law Judge Barbara Gerber.
Do we have a better connection?
It is better.
All right.
So let me try to connect Ms. CLIENT again.
It's dialing.
Please leave your message for ###-###-####.
Ms. CLIENT, this is Administrative Law Judge Barbara Gerber calling regarding your unfinished
unemployment appeals hearing.
I'm going to wait a couple of minutes and then I'll give you another call and hopefully
we can make a connection at that time.
Thank you.
So Mr. Forberger, I'm going to give her about five minutes and see if she can figure out
either a different phone or location and get to some spot where we can finish the hearing.
All right?
Attorney Forberger?
Attorney Forberger?
Yes.
Okay.
Okay.
Okay.
Okay.
Okay.
Okay.
Okay.
Okay.
Okay.

This transcription is pretty good. But, it is still a long ways from replacing a court reporter.

Advertisement

Menu on wrong side of the screen in Vivaldi

Tags

In recent versions of Vivaldi, the menu has started appearing on the right side of the window.

Vivaldi in Xubuntu  with menu on right side of screen

I am a stickler for usability, and so I want a menu showing. I also follow the original human interface design guidelines of trying to have window controls on the upper-left corner of windows/screens.

Any insights into how to fix this display bug in order to get the menu back on the left side of the window?

This bug is showing up on all my computers. Here are the basics:

System:
Kernel: 5.17.5-76051705-generic x86_64 bits: 64 
Desktop: Xfce 4.14.2 Distro: Ubuntu 20.04.4 LTS (Focal Fossa) 

Not all is hunky dory with Linux, but it is doing as well as others

Tags

,

Dedoimedo has an excellent commentary of the state of the Linux desktop.

He notes that usability has plateaued in many ways. I agree. The basic functionality and speed I had with Xubuntu 14.04 (Trusty Tahr) was stellar. Now running Xubuntu 20.04 (Focal Fossa) on both newer and faster desktop and laptop computers, I have had problems with graphics cards, samba networking is a bust that I work around, and connecting my iPhone for file transfers is hit or miss.

Yes, the world is not standing still. Linux systems like Xubuntu are actually undergoing massive changes through updates to the xfce window manager while still trying to retain the same general look and functionality. That kind of work is much harder that simply creating something new (like restoring an old house with good bones than building a new house on an empty lot). But, that hard work does not mean longstanding defects should remain. A remodeling job for a house is still incomplete if the electrical wiring is exposed or the finish carpentry is not in place.

Note: In contrast to Dedoimeda’s review of Xubuntu 20.04, the limitations with the current version are not a problem for how I have set up my computers. And, I value the hardware control and compatibility I get with this version of Xubuntu. For instance, whereas Kubuntu has no obvious method for adjusting sound inputs and hardware, I have obvious access through Xubuntu’s PulseAudio plugin on my panel.

The splintering that occurs in Linux systems with new distributions and spin offs popping up all over the place — a major factor in Dedoimeda’s criticism — is surely an important reason for why the edges are more frayed today than they were a few years ago. Some self-discipline and focus is needed in the world of Linux, just as self-discipline and focus is needed in most of life.

An example of this concentrated focus and so deserving of praise is LibreOffice. On my setup without the ribbon but with traditional menus and one toolbar customized with the formatting tools I use, LibreOffice has been a joy to use with the newer versions (currently running v.6.4.6.2).

LibreOffice word processor

Finally, it should also be pointed out that usability has seemingly plateaued on other operating systems as well.

I still have a Mac for the family computer, and more and more software is broken on the current version — Catalina/10.15 — without much if any additional benefit. Snow Leopard/10.6 was a model of stability and design, and in general the Mac has yet to repeat that performance.

My daughters want to game, and so they both now have Windows 10 desktops. Certainly more software is available on Windows 10 than either MacOS or Linux systems. But, Windows 10 remains a complete kludge in many ways, with both new and old (aka Windows 7) design elements remaining throughout. For instance, there are Settings but also many vital settings still must be set via the Control Panel. Why? How can these dual settings systems still exist?

Issues with the new Insync3

Tags

Insync has undergone a major re-write of the underlying sync frameworks from version 1.5.x to 3.0.x.

Integration with file managers like thunar is a work-in-progress with this new version. More troubling is a major change in sync behavior with the series 3 version. While the new version has many more syncing options, there is a significant change that is NOT adequately explained.

Previously, all files in the sync folder were synced across google drive and the computers connected via Insync UNLESS you selected parts of the folder/directory for a manual or no sync.

With an upgrade to version 3, however, all files on a computer are synced with google drive, but new files created on one computer are no longer added to other computers connected to google drive via Insync. As a result, folders across computers will get out of sync with each other, which kinda defeats the whole purpose of syncing software for most folks.

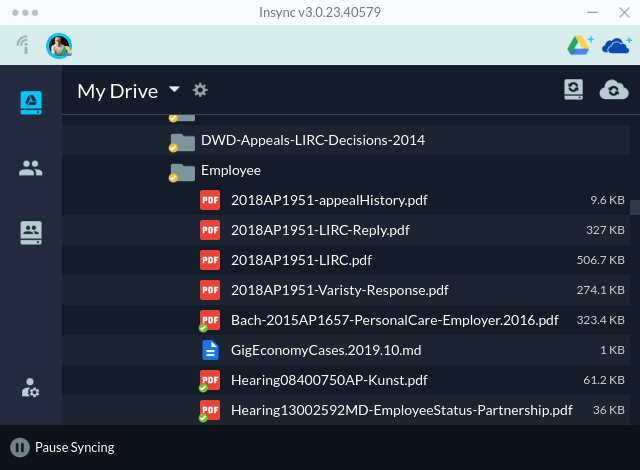
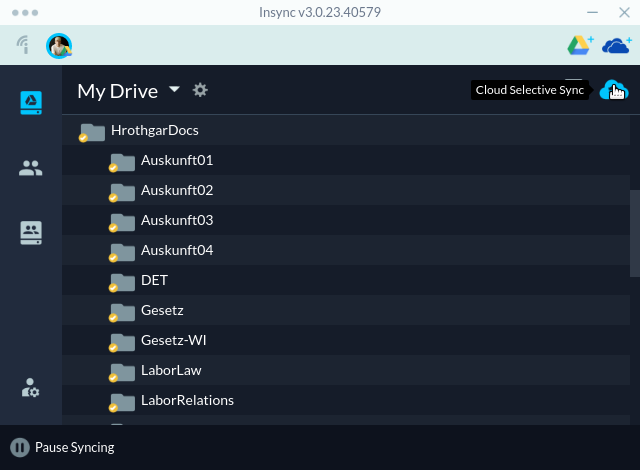
Here is what you will see when examining an un-synced folder from within Insync:

Un-synced folder contents

In this Employee folder, there are numerous files that are NOT synced on the particular computer on which Insync is running. These files were added on another computer and synced to google drive. But, the files are NOT synced automatically to other computers unless I now tell Insync that I want these files synced with this computer.

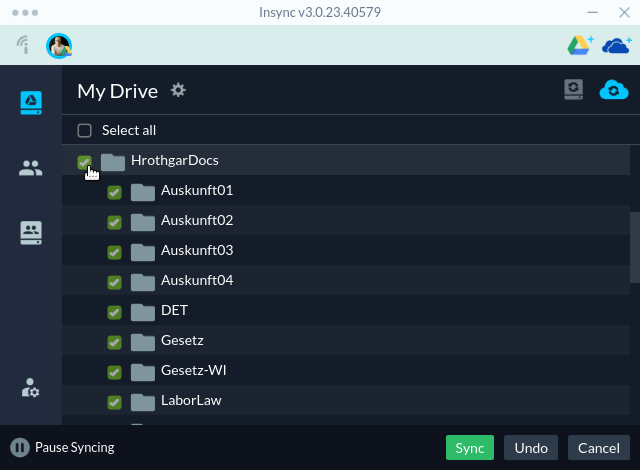
To fix this problem, on each computer you need to go to that folder from within Insync and then select the cloud selective sync option:

Selecting the selective sync option

You then need to select the folder (or file) you want to sync on that computer:

Folder to sync selected

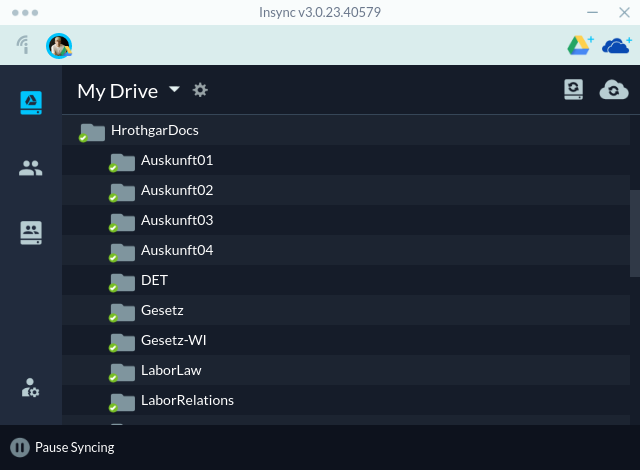
Then, click on the green Sync button, and the contents of that folder and all sub-folders will be synced on that specific computer:

Folders synced

This process needs to be done on each computer and for every folder that needs to be synced across those computers.

Update (16 Sept. 2020): The security key for the Insync PPA expired this month. The Insync forums have the solution:

sudo apt-key adv --keyserver keyserver.ubuntu.com --recv-keys ACCAF35C

Updates and upgrades should proceed normally after entering this terminal command.

Geekbench scores

Tags

, ,

Here are some comparative geekbench scores between a 2011 MacBook Pro, a thinkcentre desktop, and a 2018 Galago Pro from System76:

Single-Core scores
MacBook Pro  desktop  Galago Pro
2935         2186     4209

Multiple-Core scores
MacBook Pro  desktop  Galago Pro
6282         3493     11636

The MacBook Pro is a 13-inch Early 2011 model with 8 MB of memory and an Intel Core i7-2620M running at 2.7 GHz and an SSD replacing the original hard drive.

The desktop is a Lenovo 7373BC7 (aka a thinkcentre m58-7373) with 4 MB of memory and an Intel Core 2 Duo E8400 running at 3.0 GHz, a basic Nvidia graphics card, and an SSD for the boot drive.

The Galago Pro (previously reviewed here) has 8 MB of memory, an Intel Core i5-8250U running at 3.40 GHz, and a fast SSD for the boot drive.

shrinkpdf: making PDF files smaller

Tags

Ghostscript is the open source command-line access to everything postscript and PDF. Because ghostscript can do nearly everything with these files, however, it is not the easiest to use. The options can and are overwhelming to casual users who may need ghostscript for occasional and very specific purposes.

Luckily, a host of utilities have been created around ghostscript. For example:

$ ps2
ps2ascii ps2epsi ps2pdf12 ps2pdf14 ps2pk ps2ps2
ps2eps ps2pdf ps2pdf13 ps2pdfwr ps2ps ps2txt

$ pdf
pdf2djvu pdfatfi pdffonts pdfopen pdftops
pdf2dsc pdfclose pdfimages pdfseparate pdftocairo pdftosrc
pdf2ps pdfdetach pdfinfo pdfsig pdftohtml pdftotext
pdf2svg pdfetex pdflatex pdftex pdftoppm pdfunite

One utility missing from this list is the ability to make a PDF smaller in file size. Scanned full-color images can often run several megabytes in size per page.

Luckily, Alfred Klomp has created a bash script for getting smaller file sizes with PDFs via ghostscript: shrinkpdf.

To create a script/command-line application available in Ubuntu’s various flavors at any time/location from within the terminal, copy the downloaded file/script to the .local/bin/ directory in your home directory.

Then in this directory, run the command chmod 777 shrinkpdf.sh to make the file executable.

You now have a terminal command, shrinkpdf, available to you from any directory/folder location within the terminal.

A fix for the DropBox file system warning

Tags

,

Because I have an encrypted home folder on an ext4 formatted volume, Dropbox stopped working.

DropBox warning message

Luckily, Alan Pope has a solution at his popey blog.

He essentially has created a shell script for you to download and run (after shutting down DropBox on your computer and backing up all of the files).

After downloading the script (I simply copied and pasted it inside a text editor and then saved it as a file called move_DropBox.sh), make sure to edit it to adjust the size of your DropBox folder. For instance, I only need 10G for my DropBox files, so I changed the reference in the shell script from 20G down to 10G.

Then, you need to make the script executable with this command:

$ sudo chmod 777 move_DropBox.sh

To run the script, type the following command:

$ sudo ./move_DropBox.sh

The shell script will take 5-10 minutes to run (more or less), depending on your computer CPU, the speed of your hard drive, and the size of the dropbox image file that is being created.

To test the result, I logged out and then back in. Sure enough, I now have a new disk image file called Dropbox mounted on startup. But, DropBox threw up a warning about file permissions. It appeared that the files inside the new DropBox image were connected to the root user, not me.

The following command fixed that error:

$ sudo chown -R username:username /home/username/Dropbox

Note: make sure to substitute username with your actual username on your computer. This command makes me, not root, the owner of all files and folders of Dropbox. It looks like the last two commands in the shell script did not work for me, and this command fixes that error.

So, when I typed dropbox start, everything worked, and DropBox is now running and synced again.

Note: Hat tip to http://planet.ubuntu.com/ for rebosting Alan’s DropBox fix. My thanks to both.

UPDATE (27 Dec. 2018): Rebooting the computer led to an ultra serious error that prevented the computer from completing the boot process. Yikes. The error concerned a failure to mount a volume, and I tracked down the error to the new fstab entry for mounting my new DropBox volume. The solution was to comment out the new fstab entry by putting a # in front of it.

Now, the computer boots without a hitch. But, DropBox does not start (as the volume where all the files are located does not exist at startup). The solution is to run the following command:

$ sudo mount -o loop .dropbox.img /home/username/Dropbox

I then run dropbox start, and DropBox runs without a hitch. Ideally, I need an automated solution, so I need to get the fstab entry working. I am short on time, however, so this solution works for now. After all, this computer only gets rebooted around every blue moon. That’s the nice thing about Xubuntu (and Linux in general): flexibility.

Fix for ImageMagick convert errors with pdf files

Tags

,

All of a sudden on 18.04 of Xubuntu, my ability to convert image files to PDF has stopped working.

Normally, I could do the following at the terminal:

$ convert image*.jpg NEW.pdf

to convert a series of image files into one PDF file. Now I get an error. For instance:

$ convert MarsSunset.jpg new.pdf
convert-im6.q16: not authorized 'new.pdf' @ error/constitute.c/WriteImage/1037.

After a few weeks of these errors (and resorting to GIMP to convert the image files by opening and then exporting them to PDF format), I found the following posts on the twitter.

Ross Campbell III @rosscampbell Oct 5

If you update Ubuntu and your web app’s PDF generation breaks, it’s because the latest Ubuntu ImageMagick packages DISABLE generation of .ps, .eps, .pdf, and .xps files !!! You can fix this by editing /etc/ImageMagick*/policy.xml and deleting the ‘disabled’ lines.

Hee-Woong LimĀ @heewlim Oct 5

Due to recent security vulnerability of ImageMagick, some file format has been disabled. If you wanna convert those file format (such as pdf -> png), you need to modify /etc/ImageMagick/policy.xml https://usn.ubuntu.com/3785-1/

If you click on the security notice, you will see the following:

Due to a large number of issues discovered in GhostScript that prevent it from being used by ImageMagick safely, this update includes a default policy change that disables support for the Postscript and PDF formats in ImageMagick. This policy can be overridden if necessary by using an alternate ImageMagick policy configuration.

That policy change, as noted by Ross Campbell, is disabling PS, EPS, PDF, and XPS files for use with convert. Yeesch.

So, there is a security problem with PDF files. PDF files on Linux systems are usually handled by ghostscript (via the terminal command gs). And, ImageMagick (done through the terminal convert command) uses ghostscript for reading and writing PDF files. Because the security problems are serious and numerous, ImageMagick’s access to PDF files is then cut off.

Granted, through these security flaws in PDF someone could craft a malicious image file that, when converted by ImageMagick into a PDF, will then do very nasty things to your computer.

But, ghostscript has since been updated once and once again with security fixes. How about a fix for ImageMagick to get PDF functionality back? Or, at least an explanation of progress towards fixing this issue?

In the meantime, you can install img2pdf:

$ sudo apt-get install img2pdf

The terminal command to run will be in this format:

$ img2pdf --output NEWFILE.pdf IMAGEFILE.png

Or, as noted by Ross Campbell, you can ignore the security problems and delete the policy restrictions. Sigh.

Encryption on the go

Tags

VeraCrypt has replaced TrueCrypt as the all-around, essential encryption software everyone should be using.

For instance, any password info for your computer, financial info (account and social security numbers), personal/private encryption keys, and pics of essential documents can be kept in an encrypted volume on a USB stick that you take with you at a moment’s notice but which no one — we all hope — can unlock.

Dedoimedo has a quick run-down on how to use VeraCrypt. The official documentation has more detail than you probably want to know.